What Is A Local Ranking Geogrid?
Unlocking the Potential of Local SEO with GeoGrid Technology”
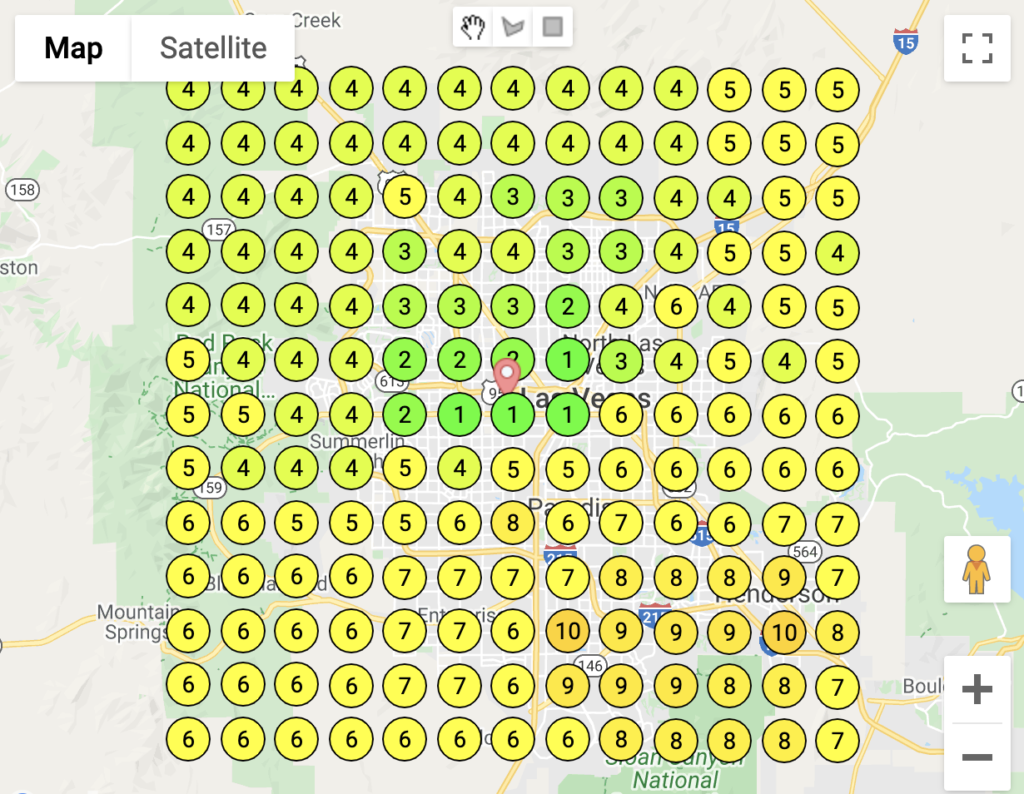
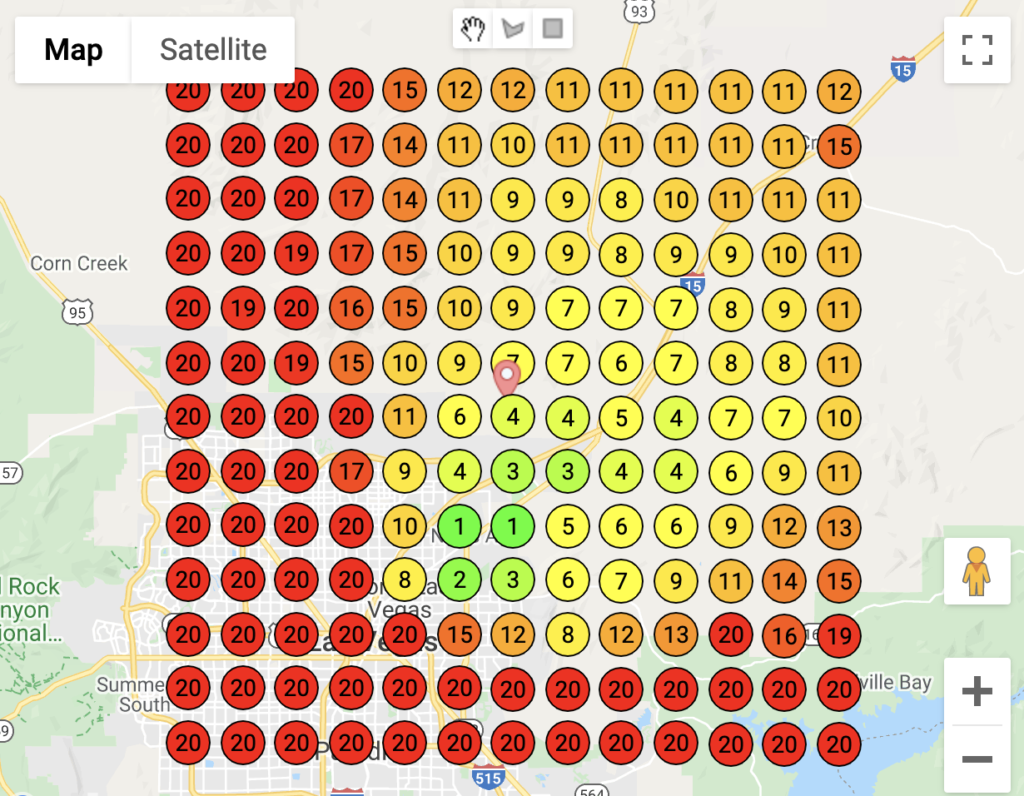
Local GeoGrid is a ranking analysis tool that enables users to monitor their Google My Business rankings across various geographical locations, such as different neighborhoods within a city. This functionality allows you to assess the position of your Google My Business listing in local search results for your selected keywords and track how these rankings change over time. By using this tool, you can identify both the strong-performing and underperforming suburbs within your city for your or your client’s business. On the left side is a visual representation of the obtained results.

How To Utilize LeadSnap Local GeoGrid
LeadSnap Local GeoGrid is a powerful tool for businesses seeking to enhance their local online presence and improve their visibility in search engine results. Here’s a step-by-step guide on how to effectively utilize this technology:
1. Accessing LeadSnap Local GeoGrid: Start by logging into your LeadSnap account or creating one if you haven’t already. Once inside, navigate to the GeoGrid section, where you can access the tool. LeadSnap typically provides user-friendly interfaces, making it easy to get started.
2. Define Your Target Area: Begin by specifying the geographic area you want to focus on. You can choose a specific city, region, or even a custom-defined area by selecting specific coordinates. LeadSnap Local GeoGrid allows you to fine-tune your targeting, ensuring you concentrate on the most relevant locations for your business.
3. Data Collection and Analysis: Activate the GeoGrid tool, and it will start collecting and analyzing data about local search results in your chosen area. This data includes rankings, competitors, and other relevant information. The system typically updates this information regularly to provide you with accurate insights.
4. Actionable Insights and Optimization: Once the data collection is complete, you can access detailed reports and insights through LeadSnap. These insights will help you understand your local search performance, identify competitors, and pinpoint areas for improvement. Use this information to optimize your Google My Business profile, create location-specific content, and refine your marketing strategies to boost local visibility and attract more customers.
By following these steps, you can effectively leverage LeadSnap Local GeoGrid to enhance your local SEO efforts and gain a competitive edge in your target geographic area. Regularly monitor and adjust your strategies based on the insights provided to ensure that your business continues to thrive in local search results.

How To Use LeadSnap GeoGrid?
To track a new keyword, open LeadSnap and navigate to the Local GeoGrid section. Then, choose a site from the drop-down menu located at the top left and click on the blue + button positioned at the top right. If you cannot find the site you are searching for in the drop-down menu, it indicates that you have not added it to the Site Manager yet. Instructions on adding a site to the Site Manager can be found here. Please be aware that you must also input your Google My Business details into the Site Manager if you have not already done so. This can be accomplished by visiting the Site Manager, selecting the specific site, clicking on the three-dot icon located at the top right-hand side, and selecting “Edit Site.” You will then have the option to either manually input the information or connect to Google My Business.
After clicking on the blue + button in LeadSnap GeoGrid, you will need to complete the form as follows:
- Enter a Search Term and Address. Google will provide you with some suggested addresses; choose the appropriate one.
- The Business Name field will be auto-filled. It utilizes the business name you entered in the Site Manager, so ensure it matches the display in Google My Business.
- Select a Distance Type (kilometers or miles) and the Distance you wish to cover.
- Choose a Country, Grid Size, and select a Check Period (either 7 or 30 days). Once you have filled out the form, click on the “View on Map” button. This will display a preview, as illustrated below. You can make adjustments, such as modifying the Distance or Grid Size, if necessary. If everything appears correct, click the search button. The search may take some time, typically around 30 minutes on average.
Once the search is finished, you will be redirected to the LeadSnap GeoGrid section, where you will find a table listing all the keywords you searched for, along with valuable information such as the average position, the number of keywords in the Top 5, 10, and 20, and more. Clicking on a keyword will display the map results, where each number signifies a position in that specific location.
You can easily switch between different check dates using the drop-down menu at the top right of the map or the slider located beneath the map. This enables you to observe where you or your client ranks in various locations on a map and track positions over time. It’s important to note that these positions represent your or your client’s keyword rankings in Google’s local search results.
By clicking on the three-dot icon above the map, you will have the option to export the data to PDF or delete the grid. Additionally, you can send a keyword directly from LeadSnap Tracker to LeadSnap GeoGrid by clicking on the three-dot icon at the right end of the keyword and selecting “Send to LeadSnap GeoGrid.”
LeadSnap GeoGrid In Instant Check
Operates on the same principles as LeadSnap Tracker, with the distinction that it enables you to check keyword positions for any business, not exclusively those linked to sites you’ve added to Site Manager.
To begin, launch Instant Check and navigate to the Local GeoGrid section. Then, click the blue + button situated at the top right corner. You will be prompted to input the same details as you would in LeadSnap Tracker, with the exception being the check period. Here, you’ll have the option to select between a regular check (which takes up to 18 hours) and an instant check (completed in less than 30 minutes). Keep in mind that an instant check consumes twice as many credits as a regular check.
Once the search is finished, you can access the results within the Instant Check’s Local GeoGrid section. Here, a table displays all the keywords you queried, along with valuable information like the average position, the count of keywords in the Top 5, 10, 20, and more. It’s important to note that you can revisit previous searches in Instant Check, enabling you to compare keyword positions across different time frames.
You can export keyword positions as a CSV file by clicking on the icon located at the top right-hand side of the results table. All the data generated in LeadSnap GeoGrid can be integrated into reports, which you can create and schedule in the Site Reports section. Alternatively, if you have the Agency add-on, you can include this data in client dashboards created in the Agency Dashboard section. For more details on the Agency Dashboard, you can refer to the relevant information here.

Move GMB Rankings From This
To This! ...then make it SOLID GREEN